Backyard Birding with Kenn & Temple
Attracting, Caring for, and Photographing Birds and Backyard Wildlife

This Summer’s Hummers
A selection of shots of the Ruby-throated Hummingbirds visiting us so far this season:
You can see all our Hummingbird photos in higher resolution here:
http://kenn3d.smugmug.com/photos/swfpopup.mg?AlbumID=23880981&AlbumKey=H2kHpH
We hope you enjoy them.
Kenn
Cardinal Family
We spend a lot of time hosting Bluebirds here, but there are several other songbird species who also make our backyard habitat their home. Here are some shots of our Cardinal family.
Father


Mother


Sunning

Their Fledglings:


The Parents together:

You can see all our Cardinal photos in higher resolutions here:
http://kenn3d.smugmug.com/keyword/cardinal#!i=3390887936&k=gnXdvsh
Happy Birding everyone,
Kenn
“SX50 beats all my DSLRs”
Here’s another discussion from the Digital Photography Review – Canon Talk Forum which may be of interest to our readers:
“SX50 beats all my DSLRs”
http://www.dpreview.com/forums/post/53390539
The commentary in the above forum thread raises several technical concepts that aren’t too easily understood, but which lie at the heart of successful bird photography. While the somewhat provocative title doesn’t specify so, the premise of the original post refers to photographing birds which are perched or otherwise not in-flight, at telephoto focal lengths. And with those stipulations, I believe the original poster’s enthusiastic observation about his SX50 will be correct in many cases, and for perhaps most people who photograph wild birds. I’ve already replied in the forum with excerpts from this article and will elaborate just a little further here. You can read additional comments on the topic from several other photographers at the link above.
——————————————————–
Comparing the SX50 to DSLRs
The small 1/2.3″ sensor of the SX50 with its 5.6x crop factor allows its inexpensive and lightweight 215mm lens to provide an equivalent 1200mm field of view, thereby putting considerably more pixels on the bird (or whatever distant target) than an APS-C sensor with a 400mm lens shot from the same distance. [Note: The APS class sensors found in many entry-level and mid-range DSLR cameras provide @1.6x crop factor which multiplies a 400mm focal length lens to an equivalent 640mm fov in full-frame terms].
Detail is resolved both by getting close (which the wildlife photographer does via technique and/or stealth), and by involving sufficient pixels in its capture (which long focal length lenses and high quality sensors both help to achieve). The size and quality of the sensor and the sharpness of the lens are two important factors, amongst many, in achieving the detail wildlife photography enthusiasts strive for in their images.
Certainly neither the sensor nor the lens of the SX50 can match the quality of the APS-C/Prime400mm class DSLR combo. Nor are these the only ways in which the DSLR is superior. But the DSLR rig may still not achieve the level of image quality that the SX50 can at typical birding distances, even with deep cropping. Despite pixel size and IQ, there will still be significantly more pixels resolving the details at 1200mm with the SX50 sensor than at 640mm with most DSLR sensors. With good exposures at base ISOs the IQ of the SX50 sensor can be quite good indeed, and the IQ advantage of the larger DSLR sensor will not usually be sufficient to match the level of detail captured even with cropping. Also, unlike most DSLR zoom lenses, the SX50 lens is sharp at full reach and at full wide aperture.
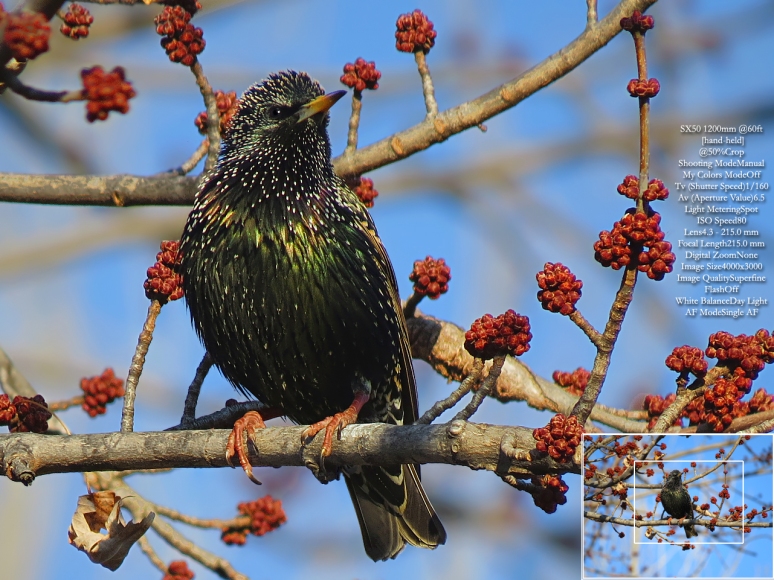
- European Starling 1200mm @60ft

Whereas telephoto zoom lenses for DSLRs (which are neither lightweight nor inexpensive), are generally not at their sharpest either at their longest focal lengths or with their apertures wide open. More expensive “prime” DSLR lenses are typically much sharper at their fixed focal lengths than comparable telephoto zoom lenses at full-reach, but they are also heavy and can be significantly more difficult to use without a tripod.
The SX50 lens also provides its sharp 1200mm telephoto reach from considerably shorter distances where the typical 400mm/DSLR kit is unable to achieve focus. And at these closer distances the SX50 not only captures sharp detail, but also provides the needed depth of field to allow the entire subject to be in focus, which long DSLR lenses often cannot accomplish even at their much greater minimum focus distances.
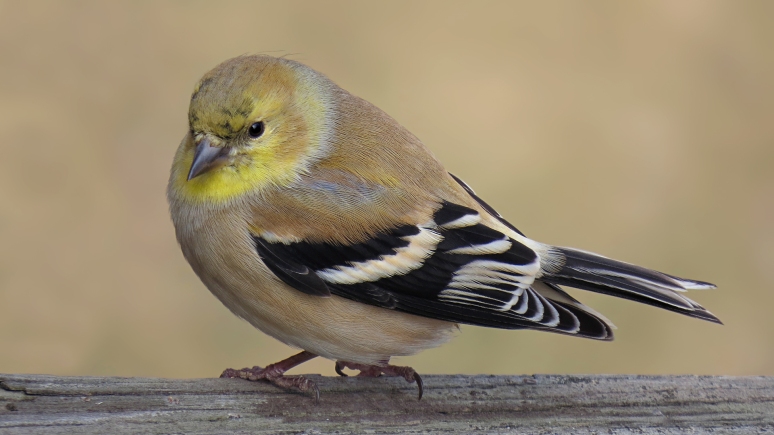
- American Goldfinch 1200mm @10ft

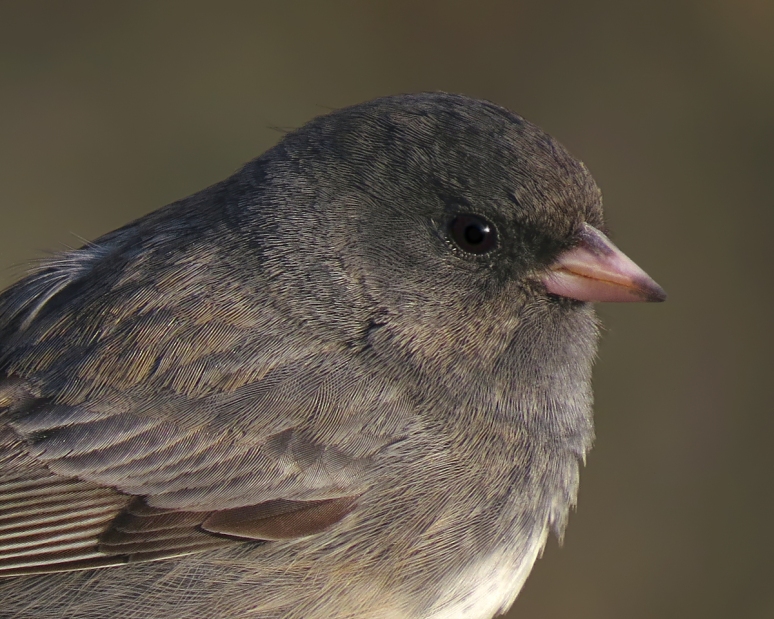
- Dark-eyed Junco 1200mm @8ft

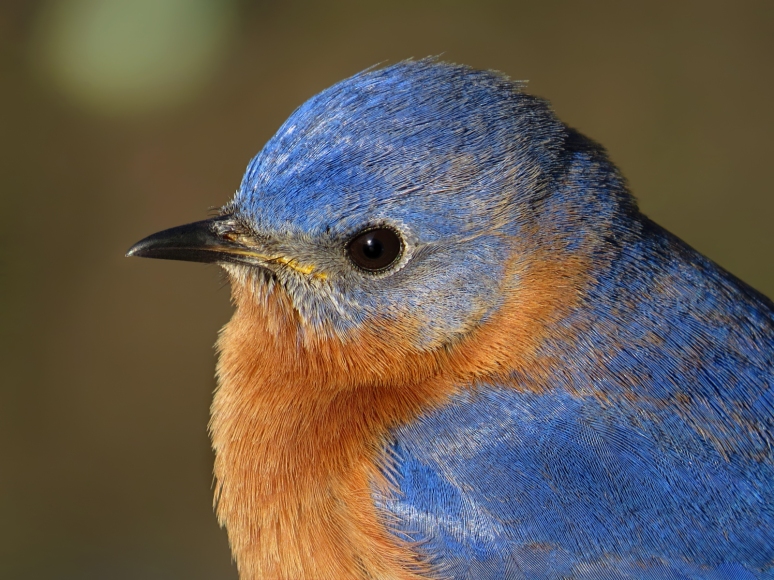
- Eastern Bluebird 1200mm @5ft

The SX50 also offers a few other advantages when photographing perching or wading birds and other stationary wildlife: Such as more effective image stabilization for easier hand-held operation; silent shutter actuation which avoids spooking the target when you do get close; and “live view” exposure and DOF (depth of field) simulation in the viewfinder when shooting in Manual mode (a little heralded feature which I personally find to be priceless*)
*See: The Case for Manual Exposure.
https://kenn3d.wordpress.com/2013/04/14/sx50-manual-exposures/
Dedicated and professional wildlife photographers know the many advantages and sacrifices involved in using large, heavy, and expensive DSLR equipment to obtain maximum quality images of distant wildlife, including birds in flight and other high-speed animal action shots. And no small-sensor compact superzoom will be up to the task for this kind of work imo. But even though the DSLR will focus and shoot faster, provide higher shutter speeds, track BIF, and offer superior image quality at the pixel level, the SX50 can still outperform it in many common birding situations in terms of capturing details in feather and fur. And of course it’s much easier to carry and afford for casual wildlife photographers.
Photographing wild birds can be very challenging even when they’re not in-flight. Getting satisfying results requires a good deal of patience, practice, and more than a little luck, with whichever gear you choose. Understanding and working with both the strengths and weaknesses of your equipment greatly improves your chances for success.
Good shooting everybody.
Kenn
Superzoom Songbird Portraits
We know that many folks prefer bird photos which include their natural surroundings and environments in the composition, and we do love these kinds of shots too of course. But we often can’t resist also shooting extreme closeup portraits of our birds, which let us see their beauty in a way that just can’t be experienced with the unaided eye. Even with the extraordinary focal lengths offered by compact superzoom cameras, they can still focus at significantly shorter distances than DSLR telephoto lenses which have less reach, and the larger depth of field of the superzoom also often allows the whole bird to remain in focus even when shooting at very close range. Of course the image quality of our small cameras is usually better at close range as well, so we have a lot of incentives to shoot this way when we can.
While we do shoot primarily songbirds and mostly in our own backyard, some may notice that a couple of the subjects in this slideshow are not really songbirds. You can see all of these and a variety of other wildlife at higher resolutions in our Smugmug Galleries:
Full-screen Slideshow
We hope that some of our readers will enjoy these images as much as we do.
Kenn
Cropping – A Closer Look
We talked a little bit about cropping in our earlier post “Megapixels and Pixel Peeping…” and have referred to it briefly many times both here on the blog and elsewhere in various birding and photography forums around the web. In this article we’ll discuss the topic in a little further depth.
I’d begin by repeating some usual and probably familiar disclaimers:
This article is written for the layman and intentionally sacrifices technical depth for the sake of simpler understanding. Further, there is no one right way to approach any aspect of photography… Various cameras, lenses, and photographers are all different each one to the next, and every photo opportunity presents its own unique set of variables and challenges as well. The concepts, examples and techniques presented here are based on our experience photographing primarily perching songbirds and other small wildlife at moderate distances, using small-sensor superzoom cameras. But we hope that our readers will find this useful, no matter which methods or equipment they use.
What is cropping?
In that above referenced Pixel Peeping post I wrote:
Even when using the longest telephoto lenses, wildlife is often still too far away to compose a shot where the subject bird or animal is large enough in the frame to present them as we’d like. In these situations cropping is frequently used to allow the target object to be shown larger in the finished image.
Wikipedia further explains that: “Cropping refers to the removal of the outer parts of an image to improve framing, accentuate subject matter or change aspect ratio…” And, of course removing any amount of the outer parts of an image results in the remaining portion being smaller (having fewer pixels) than the original. So some may wonder how cropping can result in distant subjects appearing larger in the image. This is neither magic nor magnification. It is because modern digital camera sensors capture much higher resolutions (more pixels) than can be displayed by the devices normally used to view them [note: printing is another matter]. So when we view a 12 megapixel camera image on our 2 megapixel computer screen it must be re-sampled and effectively reduced in size by discarding over 80% of the data originally captured. When we re-sample and downsize the smaller cropped version of the image to that same 2 megapixel display size however, less of the captured data is discarded and the cropped portion is therefore presented larger on our screen. I would emphasize that because less of the captured data is discarded during re-sampling, cropping can also preserve significant detail that would otherwise be lost to downsizing. But we must also be aware that the deeper we crop the “closer we get” to the pixels, where sensor level noise and artifacts will become more noticeable.
Bridging the distance
The amount and fineness of detail we see in our photos is dependent on many factors, including the angle of light and shadow, accuracy of focus, the sharpness and focal length of the lens, exposure levels, and of course the distance between the camera and subject. Two of the most important factors are: the number of “pixels on the bird” in the original capture; and the amount of detail lost when re-sampling to screen resolution.
When we shoot close enough that our subject is large in the frame, many of the sensors pixels are involved in resolving and recording the fine details of feathers and fur that we all strive for in our photos. But when our subject is distant and small in the frame, far fewer pixels are dedicated to resolving those details and far less detail is captured. Cropping in on distant subjects recorded with too few pixels tends to reveal this lack of captured detail and generally produces images of poorer quality. So ironically, the closer you get to your subject the more cropping you can do, and the less you need to.
Framing your shot
When shooting wildlife, and wild birds especially, perfect framing in-camera is both difficult and (for us at least), rarely achieved. They’re nearly always moving about, often unpredictably, and seldom pose long enough to allow composing a perfectly framed shot. Just keeping them in the viewfinder can be challenging, much less trying to capture them with ideal framing. We find it is usually much more productive to shoot with continuous drive for as long as our subject is in focus and in the frame, and hope to achieve well-framed images after the fact with cropping.
This juvenile Bluejay was in frame for about 2 seconds during which Temple managed to capture 3 usable images:
![i-zjq9cmp-XL[1]](https://kenn3d.files.wordpress.com/2014/03/i-zjq9cmp-xl1.jpg)
We chose the second frame and cropped it in a 16×9 aspect ratio:
![i-RZPL3gf-XL[1]](https://kenn3d.files.wordpress.com/2014/03/i-rzpl3gf-xl1.jpg)
We normally shoot all our cameras with the 4×3 aspect native to their sensors. But when cropping we frequently select various alternate aspect ratios based on the bird’s pose, perch, and/or other properties of the scene. Here are a few more examples:
4×3
![sx50_robin_boas_279-X2[1]](https://kenn3d.files.wordpress.com/2014/03/sx50_robin_boas_279-x21.jpg)
8×10
![sx50_robin_bit_122-X2[1]](https://kenn3d.files.wordpress.com/2014/03/sx50_robin_bit_122-x21.jpg)
1×1
![sx50_robin_portrait_038-X2[1]](https://kenn3d.files.wordpress.com/2014/03/sx50_robin_portrait_038-x21.jpg)
6×4
![sx50_robin_019-X2[1]](https://kenn3d.files.wordpress.com/2014/03/sx50_robin_019-x21.jpg)
16×9
![sx50_robin_091-X2[1]](https://kenn3d.files.wordpress.com/2014/03/sx50_robin_091-x21.jpg)
There are many widely-used conventions and guidelines for framing and cropping, such as “the rule of thirds”; leaving more space in front of the bird or in the direction it is looking; and leaving twice the space above the subject as below it; etc. But I must admit that we follow most of these conventions loosely at best, and no two photographers are likely to agree on the “correct” framing for any given image. My advice is to just be conscious of the artistic impact of your cropping decisions. Avoid clipping tails and feet, or making your subjects appear too tight in the frame …except perhaps when intentionally zoomed in for a closeup portrait. Presenting your subject large in the frame helps to maximize and preserve visible detail, but too little space in the image will often be aesthetically unappealing.
You can also use cropping to remove various unlovely elements from the frame. I like to think of this technique as “finding a frame within the frame”, where a tighter window can isolate a usable or even lovely image from within an otherwise distracting or unattractive scene.
![i-2z9vFNT-L[1]](https://kenn3d.files.wordpress.com/2014/03/i-2z9vfnt-l1.jpg)
Digital zoom and “digital teleconverter” cropping.
And finally a few words on various special camera features involving in-cam cropping and digital zoom. Many cameras including most recent model superzooms offer various combinations of digital zooming and in-camera cropping, which extend the focal lengths (telephoto reach) of their optical lens systems. Each of these options involves tradeoffs which effect the quality of the images produced when using them.
Digital Zoom magnifies the captured image using in-camera software interpolation, which generates and inserts additional (virtual) pixels into the image by averaging the data values of the surrounding pixels actually captured by the sensor. To the manufacturers’ credit, this process can actually be pretty effective when used sparingly* for screen-resolution images. It certainly can be useful for species ID spotting and “for the record shots” at extreme distances. But we rarely use it ourselves and don’t recommend it’s use for any critical or print imaging because the processing necessarily results in softening of detail as well as exacerbation of any noise and artifacts in the captured image. [*Image quality degradation at 1.2x will often be un-noticeable or barely discernible @2mp, but higher magnifications or viewing at higher resolutions will reveal loss of image quality.]
Digital Teleconverter reduces the field of view (fov), and effectively increases focal length by recording to a cropped portion at the center of the sensor. The following diagram illustrates the concept:
![i-Nm6qtvf-L[1]](https://kenn3d.files.wordpress.com/2014/03/i-nm6qtvf-l1.jpg)
Some implementations of this scheme subsequently perform digital zoom magnification back up to the full resolution of the sensor. Other implementations allow or enforce limitation of output resolutions to the size of the sensor crop which avoids degradation in image quality. This latter method can have benefits in specific applications which are beyond the intended scope of this article, but the process effectively reduces both the size and resolution of the sensor. We do not normally use any of these in-camera “telephoto enhancement” features in our bird photography, and don’t recommend them for any general use.
To crop or not to crop?
When, how, how much, and even if any given image should be cropped is certainly a matter of judgment. Some images may not require or benefit from cropping… and some may be either realized as photographic masterpieces, or be utterly destroyed by it. The great majority (nearly all) of our images are cropped to some degree… and many of them are cropped quite deeply. Getting close and putting sufficient pixels on the bird is very important of course (with any camera), but that’s only one of many vital factors in producing satisfying images. Cropping can also be a primary and critically useful part of the process.
Kenn
New Gallery for 2014
Hi all,
Temple and I have been photographing the birds and other wildlife in our backyard nearly everyday for several years, and we maintain a kind of chronological photographic history of them in our Smugmug galleries. At the beginning of each new year we open a new gallery. So here we’d like to share a few of the first 2014 photos (shot with the SX40 and SX50) which are now appearing in Birds Blossoms & Butterflies – Vol 8 .
We hope you enjoy them.
Kenn
One eye, both, and the other
Hi all,
Here is a slide presenting some deeply cropped images of a young Cooper’s Hawk, in a simple series collage.
![One%20eye_both_and%20the%20other_collage_[1]](https://kenn3d.files.wordpress.com/2013/12/one20eye_both_and20the20other_collage_1.jpg?w=774&h=435)
Shot with the SX50, even at 1200mm they’re taken a bit too far off, with too little light and not enough shutter speed to maximize image quality. So, in the absence of photographic excellence we mount some smaller portraits together in hope to still illustrate a bit of this handsome bird’s character.
Hawks of every species are difficult for us to capture and somewhat rare sightings despite our well-populated songbird habitat. Our current Virtual Gallery features them.
Kenn
Garden Variety
A recent selection of backyard songbirds captured with the SX50.
We continuously add new images to our SmugMug galleries between blog articles. This little slideshow is a sampler of photos recently posted in Birds Blossoms and Butterflies Vol.7 [2013].
We hope you enjoy them.
Kenn
MegaPixels and Pixel Peeping – A Layman’s Primer
There are many sources of information describing the scientific and technical aspects of modern digital camera functionality and design. And there is also a fair amount of proprietary technology used by various camera manufacturers which is patented intellectual property and not readily available to the public. Certainly the vast majority of camera users who simply strive to make lovely images with a digital camera can still learn to do so without multiple advanced degrees in optics and digital electronics. But a grasp of certain fundamental digital imaging concepts can still help us to improve the results we get from our cameras. Suffice to say, this article is written for the layman and intentionally sacrifices technical depth for the sake of simpler understanding. I hope it will be helpful to some of our readers.
What are Megapixels?
At the heart of every digital camera, is a relatively small electronic sensor chip which contains a vast array of tiny photosensitive elements called pixels. This sensor array plays essentially the same role that a frame of film does in film cameras. These tiny photo-sites collect the light coming through the camera lens, which is then recorded as data and processed electronically to ultimately become our digital photos. One of the most commonly misunderstood specifications of digital cameras is the quantity (measured in millions) of these tiny pixels contained on the sensor… aka the number of megapixels (mp). Camera buyers often assume that a 12mp camera is better than a 10mp camera, or that one with 24mp is superior to one with 16mp. And while there certainly can be advantages to higher resolution pixel arrays, the size and spacing of these pixels and the precision of the data they record is also crucial to the quality of the images ultimately rendered. Various classes and models of cameras use different sized sensors as well as different numbers of megapixels, and larger sensors generally offer superior image quality and dynamic range at the pixel level. So a full-frame DSLR camera with its large sensor will typically record a higher quality image than a Micro Four Thirds (MFT or m4/3) camera using a medium sized sensor, and a much higher quality image than a small-sensor compact or camera phone. These differences in sensor sizes are generally much more significant to image quality than the number of megapixels they contain.
What is Pixel Peeping?
A lot of images are never viewed at the full-resolution recorded by the camera sensor however. Indeed the vast majority of digital photos are viewed only on relatively low-resolution displays like computer monitors, TV or cell phone screens. These display devices typically have resolutions of 2mp or less, so to display the images in these smaller media formats a re-sampling of the image is done essentially discarding a large percentage of the data originally captured by the sensor. Under these circumstances it may be difficult to detect the image quality differences between the outputs of various cameras despite major differences in their size or cost.
So why do so many photographers and even casual camera buffs continue to long for that next “better” camera model with the superior “image quality”? Well there’s more to a quality image than pixels of course, but that’s what this article is about… pixels.
There are endless disagreements amongst photographers about the usefulness of viewing images at full resolution, (often referred to as pixel peeping). Many people feel that pixel level quality is unimportant since their images will never be presented at 100% size. Many also know that the quality of the images their cameras produce at full size is not too good, and so they avoid examining the quality of their photos at the sensor level. But there is a powerful case to be made for pixel peeping, and I’d like to share some thoughts on that now.
First, the sharpness and focus of any given photo taken is often not easily discerned when viewed at reduced resolutions. If a series of shots is taken of the same scene (especially hand-held), the focus and motion blur caused by camera and/or subject movement will often vary significantly amongst them. Here’s an example…
At reduced resolution these consecutively shot frames may appear to be of equal quality:

But examining these seemingly identical shots at full resolution reveals a different story:

Choosing which frame of any such series to process and/or print is obviously better done at high-res. The same is true for assessing variations in color, exposure and artifacts like noise and lens induced aberations (eg: corner softness and fringing). All of the qualities and/or deficiencies in any given photograph are better and more easily evaluated at high resolutions. This is why slide film photographers have always used a loupe or magnifier to analyze and select their best shots for processing.
For bird and wildlife photographers (or anyone shooting distant objects at longer focal lengths) there can be another important reason to pixel peep… cropping. Even when using the longest telephoto lenses, wildlife is often still too far away to compose a shot where the subject bird or animal is large enough in the frame to present them as we’d like. In these situations cropping is frequently used to allow the target object to be shown larger in the finished image. Using post-processing software to remove significant portions of the captured frame lets us present distant subjects larger in the processed photo, but doing so also means displaying the kept portion significantly closer to the full resolution of the sensor. The high-resolution image quality of the sensor thus becomes much more important and evident as deeper crops are employed. Less detail is lost to re-sampling, and any artifacts or imperfections in the pixel level image is also revealed.

Conversely, down-sampling the images captured by high resolution sensors reduces both the fine detail and the artifacts seen when viewed at reduced sizes.
Finally, for those who post-process their images, nearly every adjustment that is performed in software can be made more judiciously and with greater precision when done and evaluated at high resolution. The results of better selection and processing afforded by working on your photos at higher resolutions is most beneficial when printing or displaying them at larger sizes. But it can improve the quality of your images at whatever size you view or present them, in any media format, and no matter which digital camera was used to take them.
Kenn
Buzz is Back
Hi all,
There’s always a lot going on in the yard this time of year, and we’ve been doing a lot more birding than blogging lately. But I wanted to just do a quick post now to report that our dominant male Ruby-throated Hummingbird, Buzz, has returned once again from his long Winter migration. Some of you may remember Buzz from our posts last season, telling of our discovery of his band and his subsequent reunion with his bander, Lanny Chambers.
https://kenn3d.wordpress.com/2012/07/19/a-20-second-buzz/
Anyway, here is Buzz… back again and taking up his claim on the territory.


We’re delighted to see him return to the yard.
Kenn
Virtual Gallery

